Best practices and settings
Video and Audio settings:
Update your Zoom App
Zoom regularly provides new versions of the Zoom desktop client and mobile app to release new features and fix bugs. We recommend upgrading to the latest version when it is available to receive the best video and audio experience. Some of the tools (eg. whiteboard) also have version prerequisites requests.
Enable “Always Show Meeting Controls”
When screen sharing, the Zoom control bar will be hidden at the top of the screen. Once you scroll to the top of the screen, the control bar will appear. To keep the control bar continuously showing, select the "Always Show Meeting Controls" checkbox. By changing the setting, you don’t have to worry about the control bar appearing and disappearing upon hovering (especially if you are new to Zoom and don’t know how to make the bar at the bottom show up after it has disappeared).
From within the Zoom Desktop App:
- Select the “Home” tab.
- Select the Settings “Gear” icon. A settings pop-up window will open.
- Select the “View Advanced Features” (Windows) or “View More Settings” link (Mac) under General settings. The Zoom website will open. Login if you are prompted with the login screen. The Meeting Settings page will open.
- Navigate to the In Meeting (Basics) section of the Meeting Settings page.
- Enable the “Always show meeting control toolbar” setting.
Sharing Screen
Sharing Screen Using Dual Monitors
The dual-monitor display feature allows the video layout and screen share content to be placed on two separate monitors/screens. Gallery or speaker view can be displayed on one monitor while the other monitor displays shared content. This is useful for presentations and hiding notes from the participants.
Screen Sharing
Sharing PPT between Blackboard Collaborate and Zoom is very different. Blackboard requires uploading the PPT and converting into an image, so that you can annotate the slides. In Zoom, you need to open the PPT on your computer, then share your screen; the annotation tool is automatically available.
With Zoom, share your screen, desktop, or other content during a meeting, even while your video is on.
Share screen to the breakout rooms
Once you've put your students into the breakout rooms, you can share your screen to all breakout room.
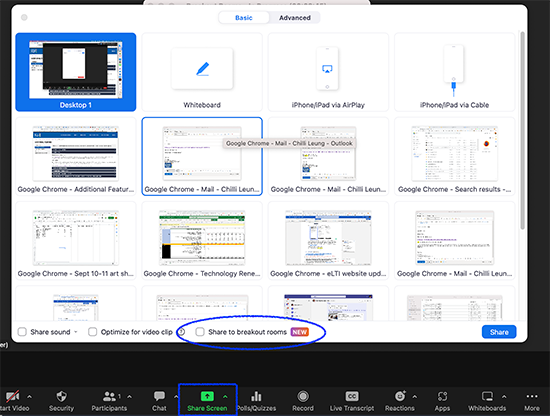
Check "Share to breakout rooms" option to share your screen form the main room.
How to give control to others
When you’re hosting a large meeting, you might need others to help you manage the meeting or give students permission to present their work. Learn how to give control.
If you'd like a participant to share their screen, you can temporarily assign them as a co-host.
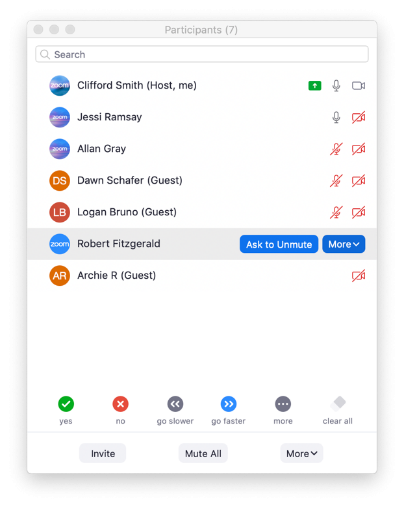
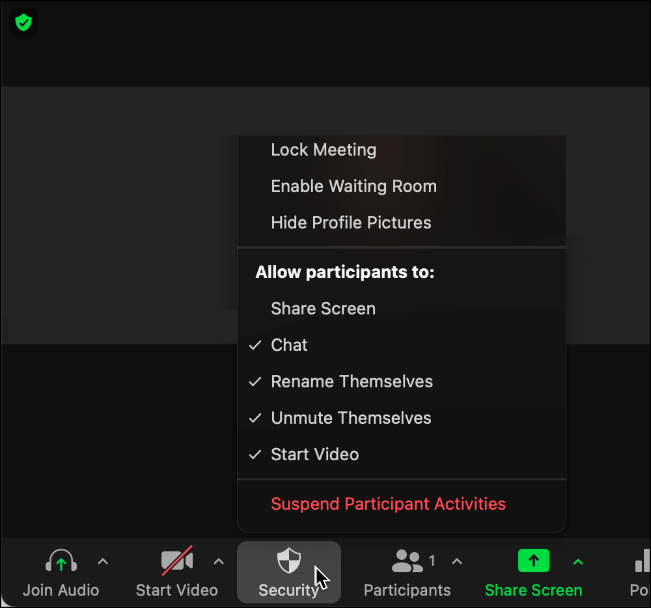
Or you can enable screen sharing for all participants via the Security toolbar.
Different roles and capabilities
Host: The user that schedules the meeting and has full permission to manage the meeting. (eg. Faculty)
Co-Host: Share most of the controls that the host, NOT able to start a meeting (course facilitator)
Alternative Host: Shares the same controls as co-hosts but CAN also start the meeting. (eg. ASL Interpreter)
Participant: When you join a Zoom meeting hosted by another user, you are considered a participant (eg. Student)
Zoom recording and attendance report
Engaging tools (Polling, Breakout Room, New Whiteboard, Annotations, Focus Mode, Virtual Background)
Note: Update your Zoom application and check individual tools prerequisites to have the best result.
Polling
The polling feature allows you to create single choice or multiple-choice polling questions during your meeting or in advance. You can also get the results from a report.
Learn more about Polling for Meetings
Breakout Room
The meeting host or co-host can split the participants of the meeting into these separate sessions automatically or manually. You can also pre-assign participants to breakout rooms when you schedule the meeting instead of managing them during the meeting. Breakout room participants will have the same audio, video, and screen share capabilities as allowed in the main session.
Learn more about Breakout Room
Whiteboard
The meeting base Whiteboard can help collaborate, capture ideas, processes, and concepts within the session. (You can save the whiteboard as a .jpg or PDF file)
To enable whiteboard:
- Start a meeting from the Zoom desktop client.
- Click the Whiteboard button on the in-meeting controls.
- Click New Whiteboard.
- Click the arrow next to All Participants can edit to choose what permissions you would like participants to have.
- Click Open and Collaborate. The whiteboard will open in your meeting window.
Learn more about the Whiteboard Control.
New Visual Collaboration Whiteboard
Visual collaboration whiteboard, providing both on-site and remote teams with a space to capture ideas both in real-time and asynchronously. New whiteboarding features include advanced shapes and connectors, adding, dragging and dropping images, while sticky notes and messages can be used to highlight important ideas.
To learn more about how to use the Visual Collaborate Whiteboard.
Annotations
Zoom’s in-meeting product features allow you to add annotations on your screen during your video calls — a tool for remote teams to easily brainstorm and collaborate. Meeting participants can add annotations while screen sharing as a viewer or the one that started sharing their screen.
Focus Mode
Focus mode allows students to stay attentive or work on their tasks while under supervision, without being distracted by others and their tasks. This feature gives the host and co-hosts a view of all participants’ videos without other participants seeing each other. This extends into screen sharing, as the host and co-host can view and switch between each participant’s shared screen, while the participants can only view their own content. If the host finds a participant’s content should be shared with others, they can easily begin sharing the participant’s screen with others.
Learn more about the Focus Mode.
Add a virtual background to hide all the mess
The Virtual Background feature allows you to display an image or video as your background during a Zoom meeting, which can provide you with more privacy or a consistent and professional look for a presentation.
